

How To Replace A Single Pane Window
How to Glaze a Window (Single Pane)
Tighten up drafty old windows with new glazing putty
Every editorial production is independently selected, though nosotros may be compensated or receive an affiliate commission if you buy something through our links. Ratings and prices are accurate and items are in stock as of time of publication.
![]() Time
Time
A full day
![]() Complexity
Complexity
Beginner
![]() Cost
Cost
Less than $20
Introduction
Single pane windows can last for a hundred years or more than if properly maintained. Learn how to preserve your windows and keep them draft-free by replacing one-time glazing putty.
Tools Required
Materials Required
- Acrylic caulk
- Glazing points
- Glazing putty (oil or latex)
- Window glass (if necessary)
On older unmarried-pane windows, the glass is usually surrounded past putty called "glazing compound," which holds the glass in place and seals out the weather. This putty often lasts decades, but over the years information technology becomes rock-hard, cracks and even falls off the window. Loose or missing compound lets wind and rain leak in around the glass.
Replacing the putty around ane pane of glass volition accept 15 minutes to an 60 minutes, depending on the size of the pane and the stubbornness of the one-time putty. Replace cleaved glass while yous're at information technology. This adds only a few minutes and a few dollars to the job—much cheaper than calling a glass repair service.
It's possible to supervene upon glass and putty with the window in place, but you'll salvage fourth dimension and become better results if you can remove the window and clamp it down on a flat surface.
If you have broken glass, get it out of the way before you lot remove the old putty. Put on heavy gloves and eye protection, place a cloth over the broken pane and tap information technology with a hammer. With the glass thoroughly cleaved up, pull the shards out of the frame by manus. Pull out the old glazing points with pliers. If the quondam glass is in proficient shape, leave information technology in place. Plus, learn how to wash your windows the fastest way with crystal articulate, streak-gratuitous results.
Project step-by-step (7)
Step ane
Remove the old window coat putty
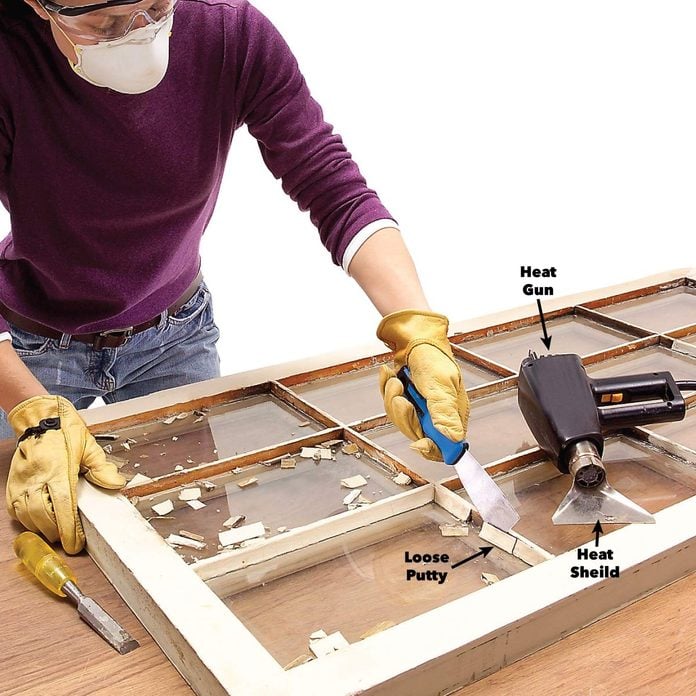
The adjacent step is to go rid of the old putty. If the putty is badly croaky, yous tin can pry away large chunks quickly with a putty knife.
Putty in practiced condition takes longer to remove. With a heat gun in one paw and a stiff putty knife in the other, heat the putty to soften it and gouge it out. Wear leather gloves to protect your hands from burns. Keep the estrus gun moving to avoid concentrating oestrus in i spot. Otherwise, the estrus will crack the drinking glass.
If your estrus gun doesn't have a heat shield attachment, protect the glass with a bit of sheet metallic. When the putty is removed, prime any bare wood inside the window frame. A shellac-based primer such every bit BIN is a good pick because it dries in minutes.
Pace 2
Former window panes: Replace the glass and putty the window
If you lot demand new drinking glass, measure the opening, subtract ane/8 in. from your measurements and take the new glass cutting to size at a total-service hardware store. Have a shard of the old glass with you to match the thickness.
Also, purchase a package of glazing points to hold the glass in place while the new compound hardens. Glazing chemical compound is bachelor in oil-based and latex/acrylic versions.
The latex products, which unremarkably come up in a tube, have a longer life expectancy and you don't have to await days before painting them as yous exercise with oil-based putty. Simply they often brainstorm to dry before you lot can tool them smoothen. If swell, smooth results are important, choose an oil-based putty.
![]()
Pace 3
Sometime window panes: Set the drinking glass in place
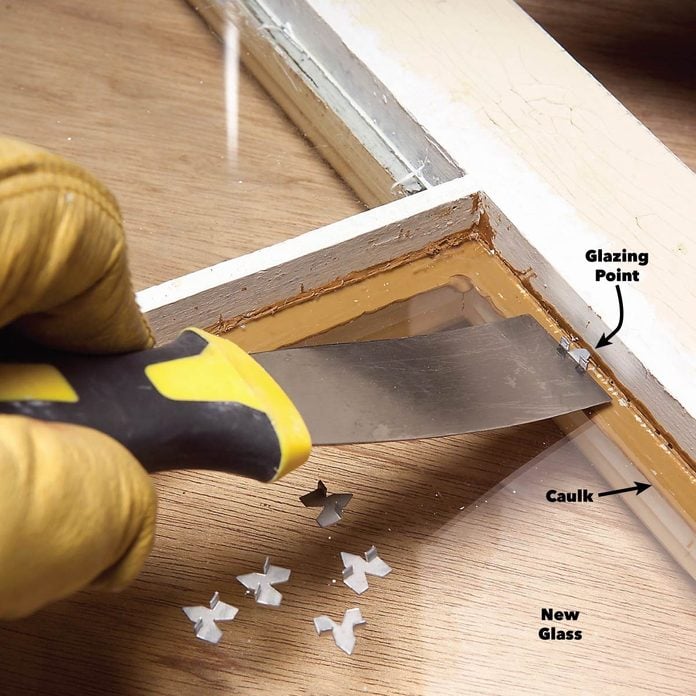
For installation of new glass, the directions on glazing compound may tell you to lay a light dewdrop of the chemical compound within the frame and then set up the glass over information technology. That works well with soft latex compound. But if you're using stiffer oil-based compound, lay in a light dewdrop of acrylic latex caulk instead. Set the glass onto the caulk, and then wiggle and press downwards to firmly embed the glass.
Press glazing points into the woods every 8 in. Let the excess caulk that oozes out under the glass harden and piece it off with a utility pocketknife later.
Step 4
Old window panes: Spread the compound
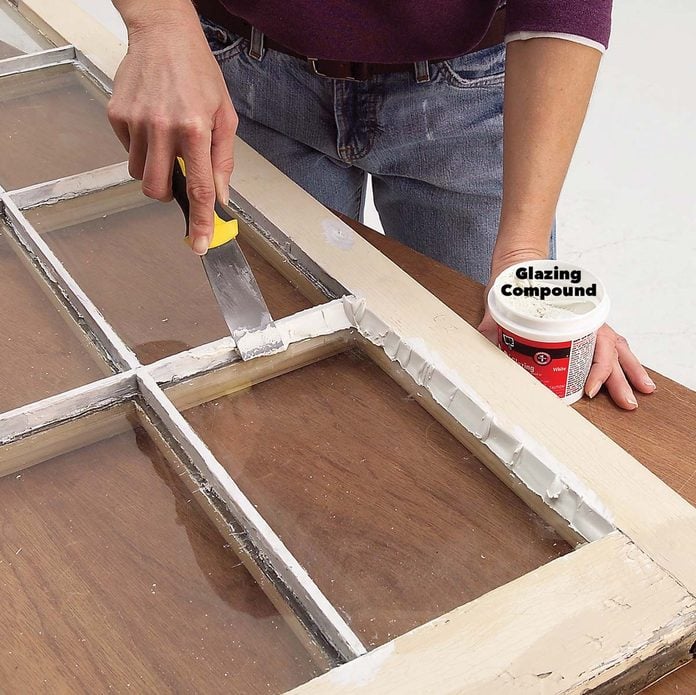
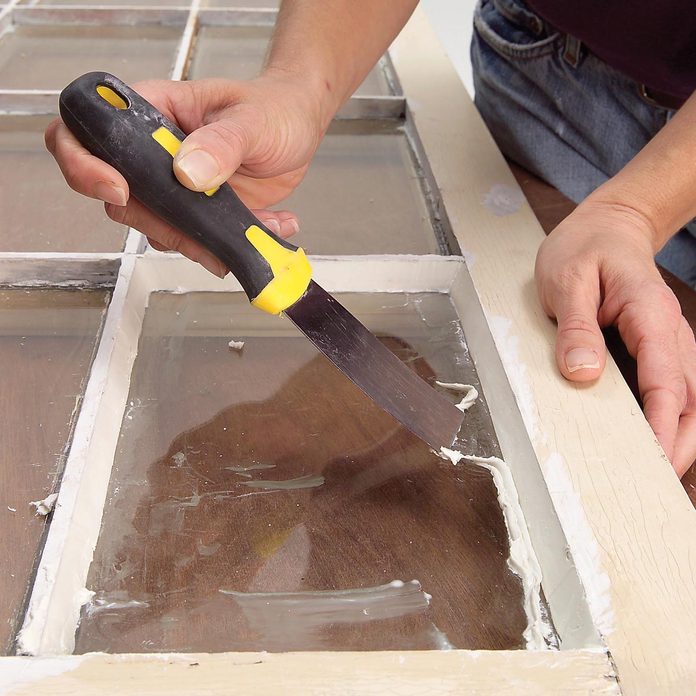
Cover the perimeter of the glass with a heavy layer of compound. Be sure to completely make full in the recess; don't leave any gaps or hollow spots.
Step 5
Onetime window panes: Smooth the chemical compound
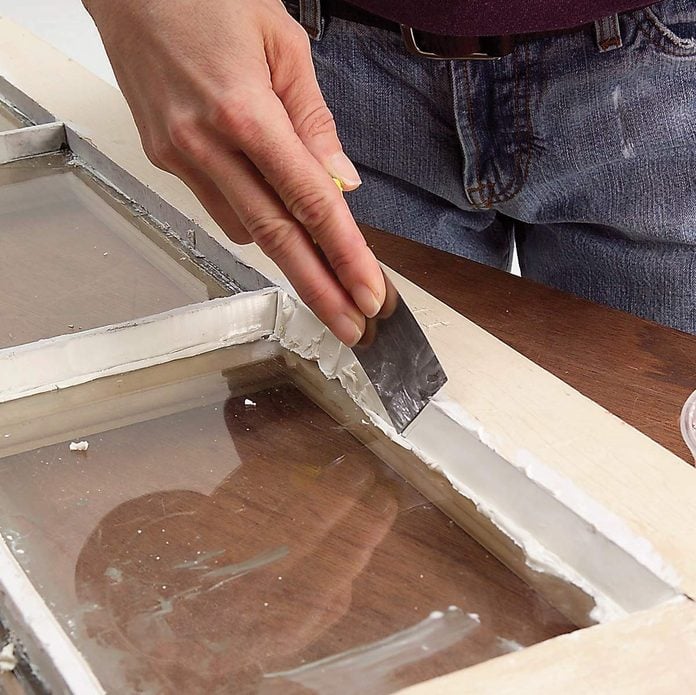
To complete the chore, smooth out the new glazing compound. Dip a putty knife in mineral spirits to lubricate information technology and smooth out the chemical compound. Wet the knife once again and run over the compound equally many times equally information technology takes to create a smoothen surface.
Oil-based putty is easier to work with when information technology'due south warm. To rut it, gear up the tin can in a bowl of hot water for a few minutes. Call up that oil-based putty remains soft for days, then be careful not to touch it after smoothing. You'll take to wait several days earlier you tin can prime number and pigment oil-based putty; check the characterization.
Step six
Old window panes: Clean the excess
Drag the ridge of backlog compound away from the finished joint and scrape it upwards. Be careful not to affect the smoothed surface.
Step vii
An alternative to putty: Mitered moldings
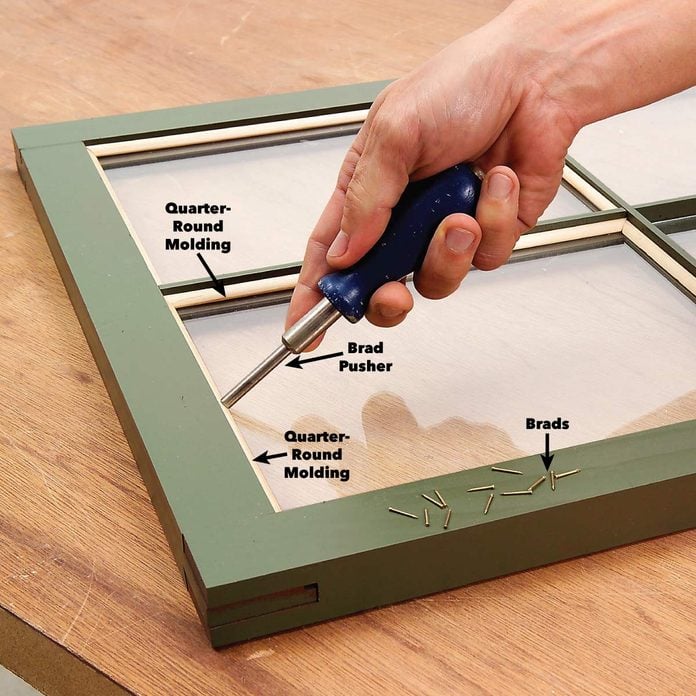
Applying a shine, perfect bead of window glazing compound is fussy, time-consuming piece of work. So when good looks matter, consider wood moldings rather than putty to hold the drinking glass in identify (1/4-in. quarter round works for most windows).
Set up the glass in place over a light bead of latex caulk. There'due south no need for glazing points. To smash the moldings in place, you can advisedly drive in tiny brads with a hammer or carefully shoot in brads with a pneumatic brad nailer.
Only the safest method is to use a brad pusher. A brad pusher is simply a metal tube with a sliding piston inside. Drop a brad in the tube, push hard on the handle, and the piston pushes the brad neatly into the wood—with little danger of breaking the drinking glass. Most hardware stores and home centers don't behave brad pushers, but you can find them at woodworker supply stores or online.
Get a brad pusher on Amazon.
Originally Published: August 27, 2019
Source: https://www.familyhandyman.com/project/how-to-glaze-a-window-single-pane/
Posted by: stringersieneat91.blogspot.com
0 Response to "How To Replace A Single Pane Window"
Post a Comment